Getting Started

Welcome

Thank you for signing up to use CaseFox®, a leading legal billing software. We are confident that you will find CaseFox easy to use and helpful for your practice. Here are a few tips to get started. Please also visit CaseFox Knowledge Base. Links to helpful information are provided throughout the program.


Timekeeping and Generating Invoices

1. Click on "Clients" tab and then "Add Client" link next to the search box to create a new client. Click on the "Add Case" link on the right side tabbed pane to create a new case (or project for a client). You may also create clients, cases and users from shortcut links on the dashboard.

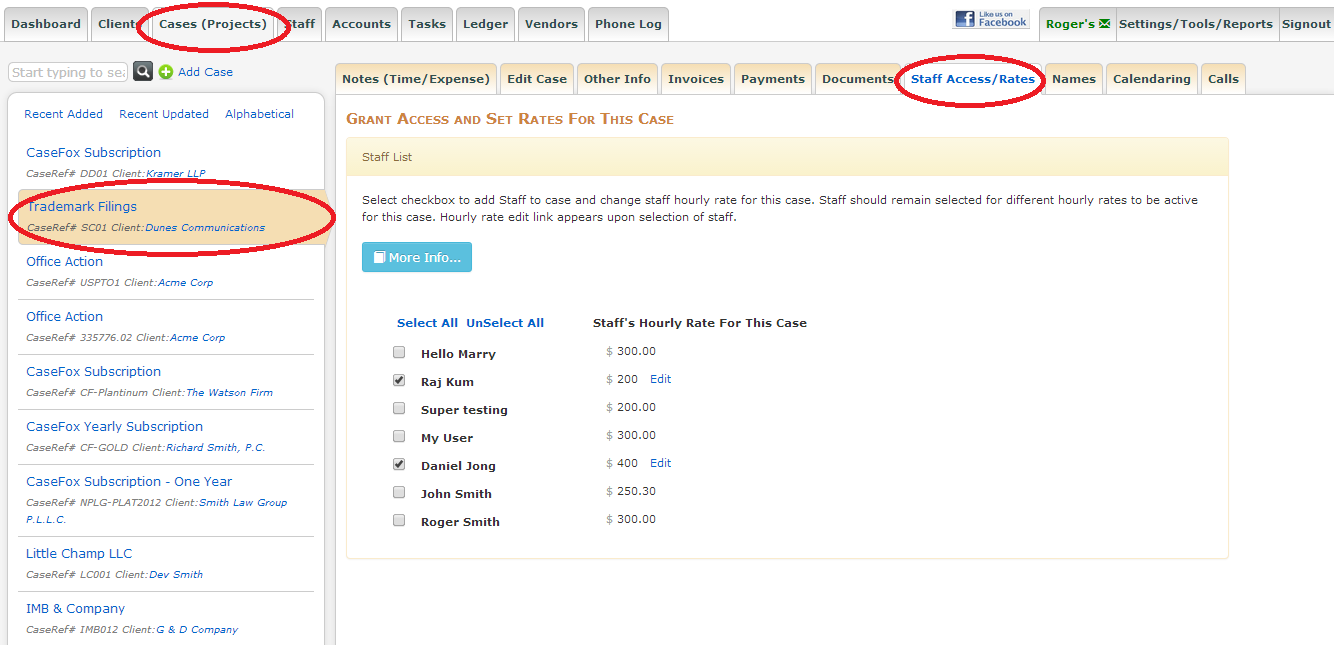
If your firm has more than one users AND/OR you want to setup different hourly rate for a case: Click on "Staff" tab and add users. Then on "Cases (Projects)" tab, in "Staff Access/ Rates" tab, you will find a listing of all users of your firm. You can grant access to selected users by checking the check box (automatically saved upon checking/unchecking). You may also enter different hourly rates of selected users for this particular case.


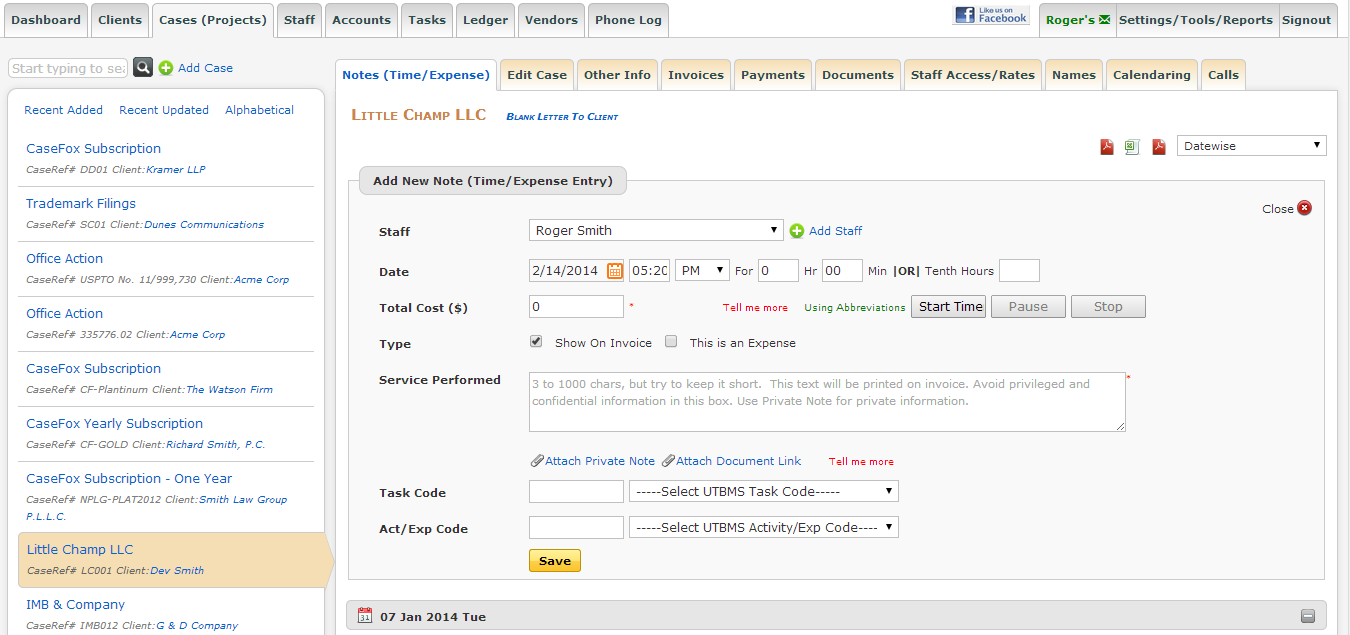
2. Select a case and on the right hand side pane, click on “Add Note (Time/Expense)” link.

3. Select the staff user on the top of the “Add Note” screen. Enter hour/min or tenth of hours (e.g., 1.2 ** To prevent rounding errors, please input time in the multiple of 3 minutes). Amount will be automatically calculated based on the hourly rates of the selected user. Please scroll down to the bottom of this page for instructions about making different types of time/expense entries.

4. Check "Show On Invoice" if this note needs to be included in an invoice.

5. Check “This is an Expense” check box if you are entering an expense. For billable expense, check both "Show On Invoice" and "This is an Expense" checkboxes.

6. Enter service performed (1000 characters max., 3 characters min.). The text in this box will be used as a line item in an invoice. See Also Using Abbreviations

7. Optionally, you may enter a private note (1000 characters max, 10 characters min) in the private note box. This text is for your eyes only. This text would help you recollect case events later on.

8. You may also enter a document url or local drive file path. Please see How To Store Documents and Additional Information.

9. If this client requires it, enter UTBMS task and activity code/expense code (or select from the dropdowns).

10. Save. The note should be listed in the list below.

11. After entering one or more notes, you may generate an invoice.

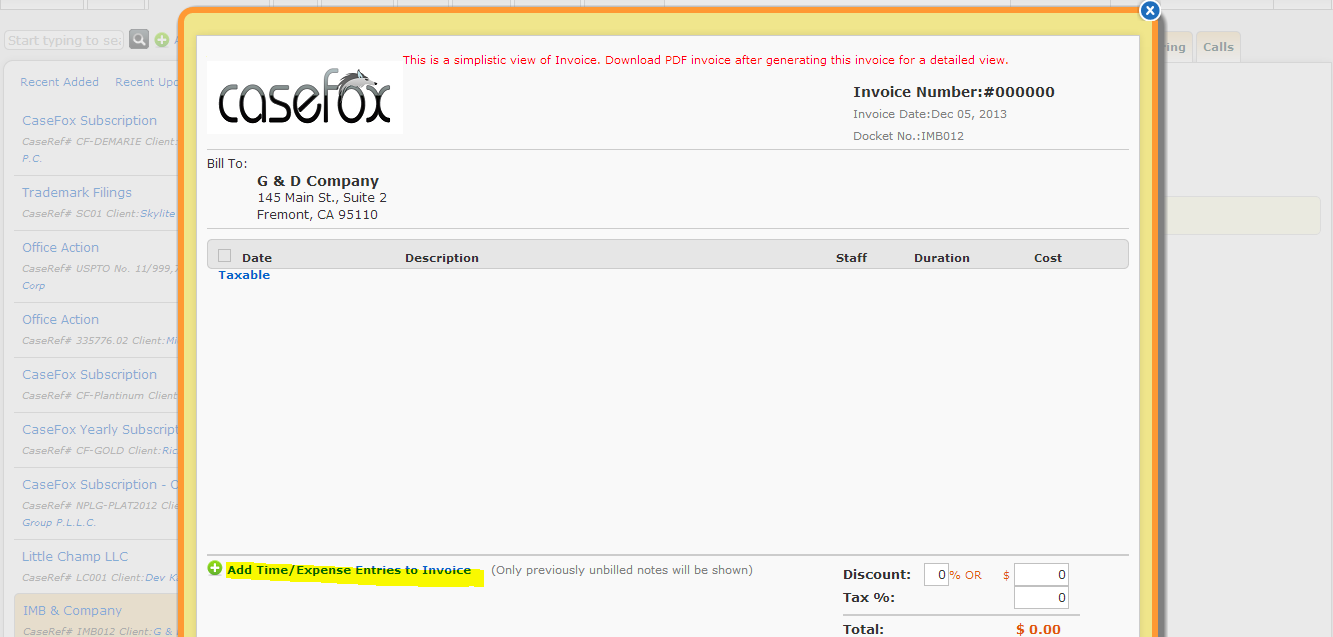
12. To generate an invoice, click on "Invoices" tab. See also Automatic Invoice Generation and How to set custom invoice numbers.

13. Click on “Create Invoice” link. Prior to generating invoices, you may click on the Settings tab on the upper right corner (after logging into CaseFox) and use the upload logo link to upload your firm’s logo.

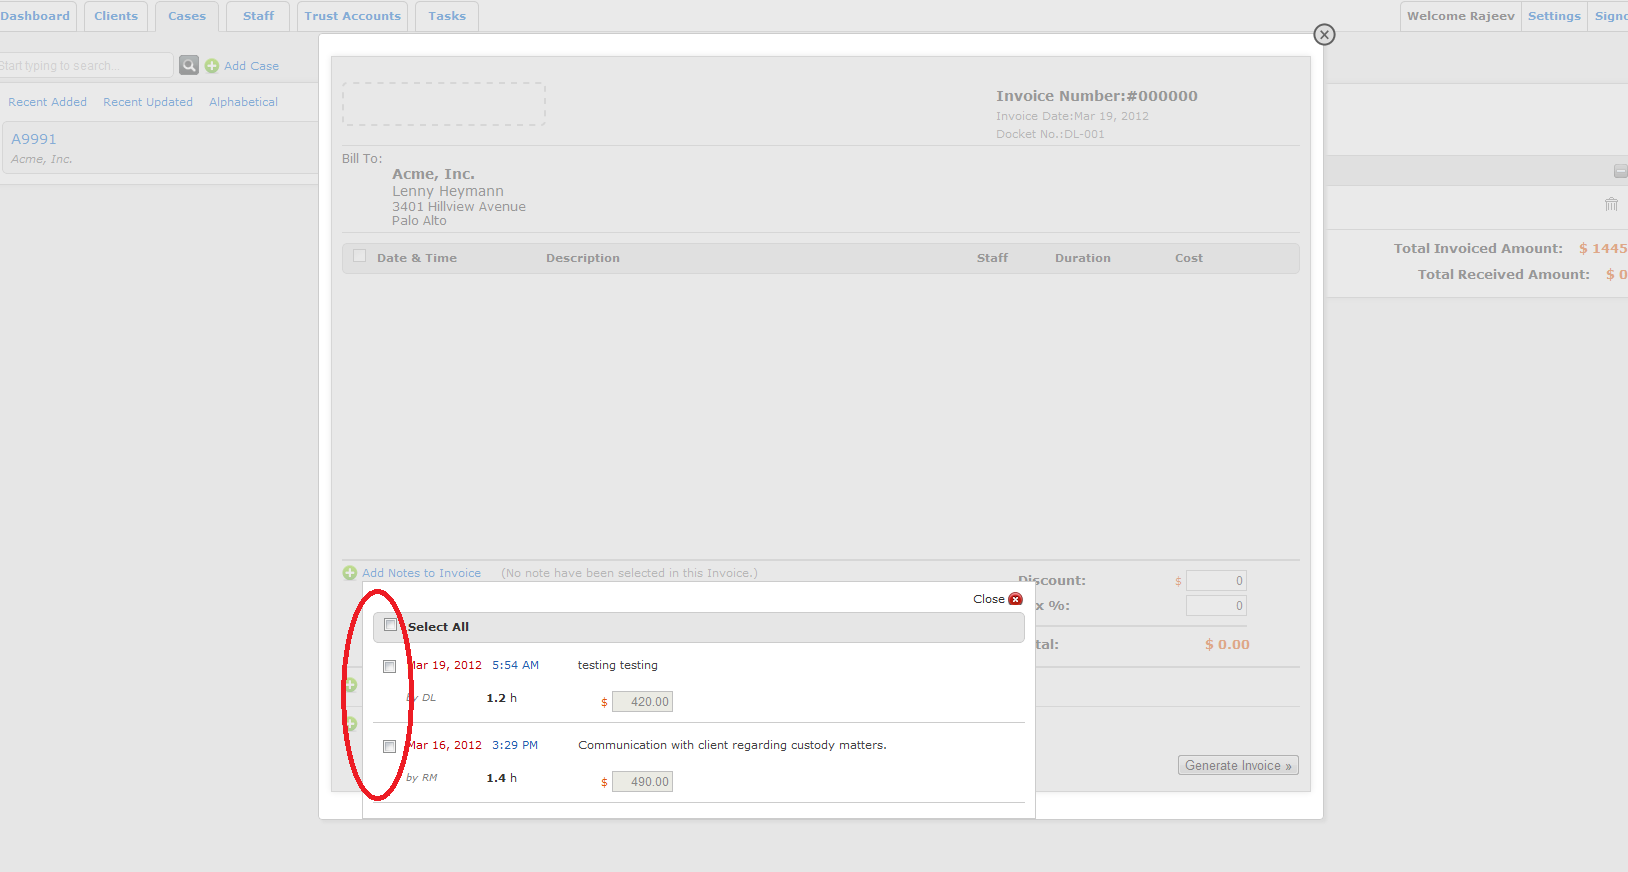
14. A pop-up will come up. Click on the Add Time/Expense Entries to Invoice link. Another pop-up will come up. Select one or more notes (or select all) to be included in the invoice (Only unbilled notes will be displayed in this pop-up, hence you may simply click on "Select All").

15. You may enter public and private notes. Public note will be printed on the invoice. You may also enter an invoice text in Clients Details (Clients tab -> Select client -> Client Details tab).

16. Click “Generate” at the right hand bottom of the pop-up to generate the invoice. You may enter a note to your client in Public Note section. Alternatively, you may click on "Clients" tab-> Select Client in the left side panel -> Client Details/Edit tab on the right side tabbed panel -> enter text in "Additional Text". This text will automatically be added to Public Note section of "Create Invoice" screen. Examples of this text could be "Please make check payable to xxxxx. Thank you."

(If some or all services are taxable in your country, you will have an opportunity to select/de-select specific invoice items to be included in tax calculations).

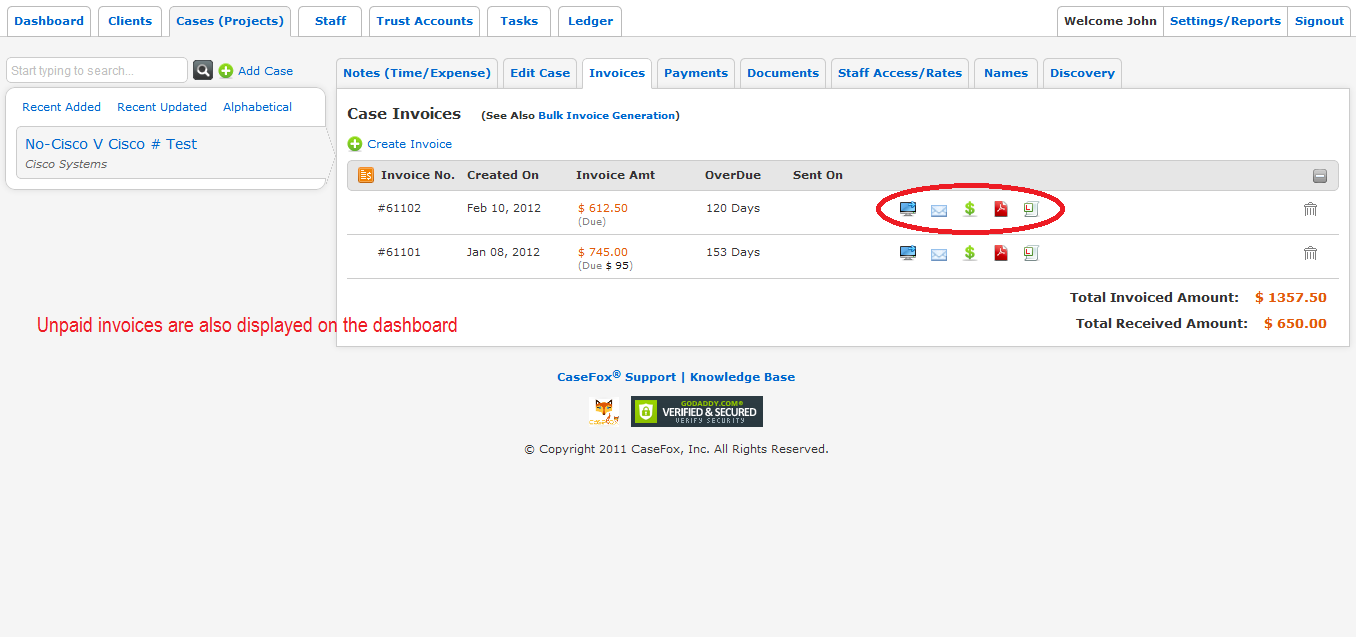
17. The newly generated invoice will be listed in "Invoices" tab. You may view, email or download PDF (or LEDES) using the icons displayed against the invoice. An invoice may be deleted (see a delete icon on the very right in the line) and re-generated using the same steps (as listed above). Invoices may also be edited. However, once a payment is recorded against an invoice, the invoice cannot be deleted (you may delete the payment, if it was entered by mistake - once you delete all payments against an invoice, the invoice can be deleted). Therefore, after generating an invoice, please download the PDF and check if everything is OK with the invoice, before sending the invoice to the client and recording a payment.

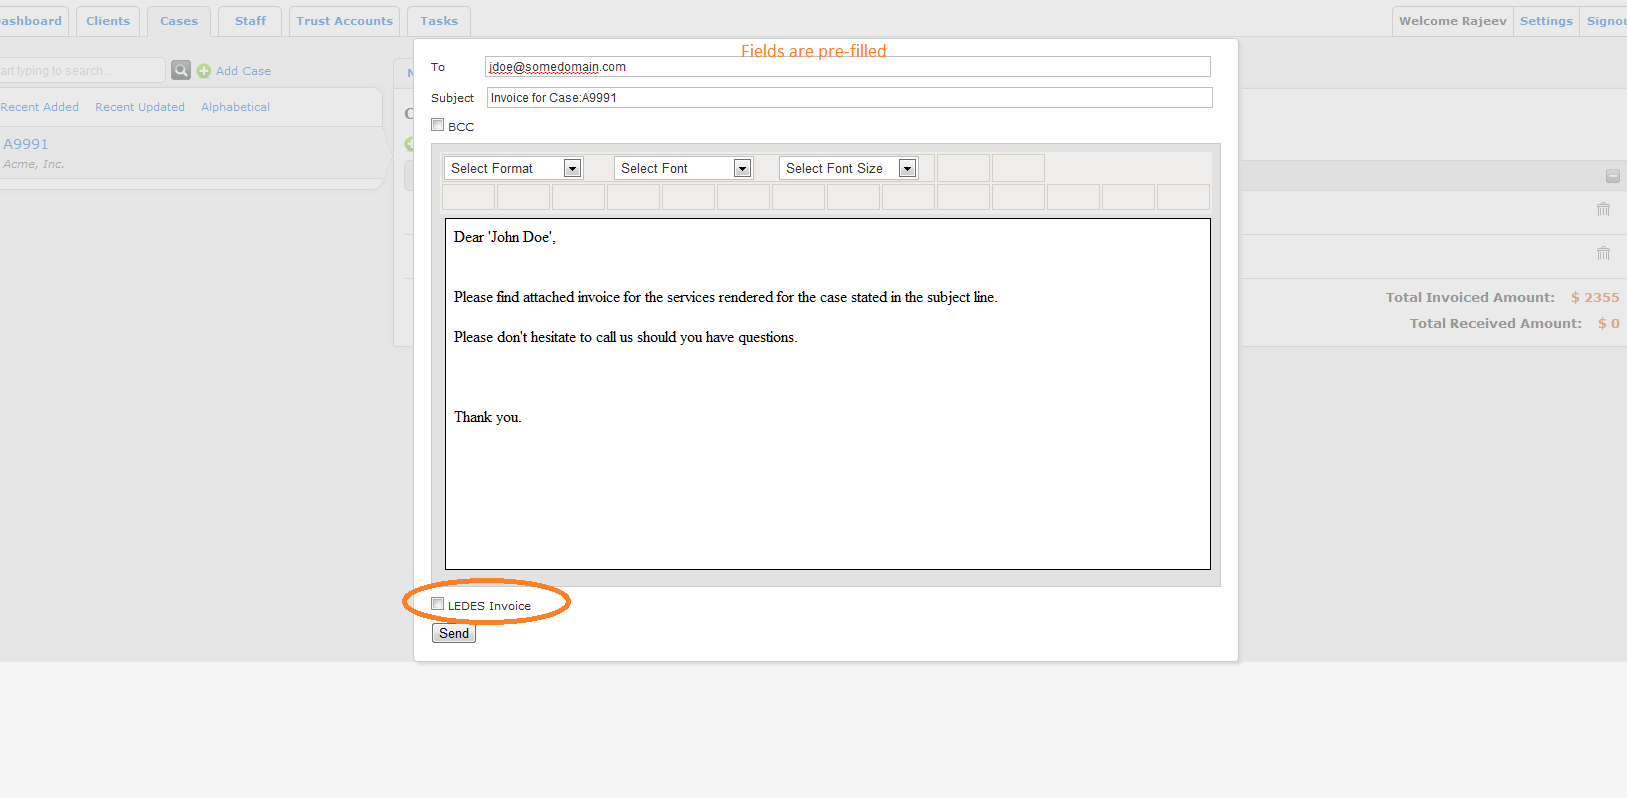
18. The Email Invoice (Envelope) icon will change after the invoice is emailed to the client. Client's email and case details will automatically be filled in the email box (Please visit Settings/Tools/Reports->Invoice/Gen. Settings to change email text). Invoice can also be emailed by downloading PDF/Word version to your computer and using your own email program.

19. Use the payment icon (green dollar icon in front of the invoice in the list) to record payments from the client. Multiple partial payments may be recorded. You may also use the Bulk Pay Invoice button under Cases (Projects) -> Invoices to automatically record payments against multiple invoices.

20. Invoices can be emailed individually from CaseFox to clients by clicking on the Envelope icon in the invoice listing. Alternatively, click on the Invoices button on the Dashboard for emailing multiple invoices from the same screen.

21. Interest Calculations: To add interest on overdue payments in an invoice on the account of previous unpaid amounts, click on the Clients tab, select a client, click on the View Client/Edit tab. Enter Yearly Interest Rate (do not add % sign). Select appropriate Payment Terms. Save. Disclaimer: CaseFox uses simple interest calculations. If an invoice is partially paid by the client prior to generating a subsequent invoice, the interest on the unpaid amount only is calculated.


Important

1. When entering expenses, make sure to also check [ ] Show on Invoice checkbox if you intend the entered expense to be included in an invoice. If you don't check the "Show on Invoice" checkbox, the note will not be presented for invoicing.

2. Click on "Cases" tab, select a case in the left panel bar. Then scroll down to the bottom on the rightside note listing. If you see an amount in "Non-Billable" category, you should review your time/expense entries. You may have not checked [ ] "Show on Invoice" checkbox in one or more notes. Of course, it is ok if you intentionally unchecked the "Show on Invoice" checkbox.

3. For entering expenses, Select [ ] Expense checkbox and notice a slightly changed screen. in "Qty" box, enter number of units (enter 1, if this is a flat expense, such as Court Filing Fees). Enter Per Unit cost. Amount in Total Cost will be calculated automatically (alternatively, you may enter total cost in Total Cost box without entering per unit cost).

4. If you have already created an invoice, you can delete it, edit the note(s) and then generate the invoice again.

Quick Tips

1. To enter an hourly billing item, enter the time (either hours/minutes or tenth hours format) in the provided boxes. System will automatically calculate the amount based on your hourly rates. (by the way, you can set different hourly rates for different cases. Click on the "Staff Access/Rates" tab, select a user, an "Edit" link will appear next to the hourly fee amount. If you don't set a different hourly rate for a user, the user's global hourly rates will be used automatically.

2. To enter a flat fee item, simply enter the amount in "Total Cost" box and don't enter anything in the "time" boxes. (this item will displayed as a "Flat" fee item on the invoice. Do not check the "expense" checkbox.

3. To enter an expense, click on the expense checkbox (and leave the "Show on Invoice" checked). Enter number of units in the box shown and then enter the total cost in the "Total Cost" box. For example, if you want to enter charges for 10 copies @ .20c/copy, enter "10" in the "Qty" box and then enter "2" in the total cost box. This item will be shown as an expense in the invoice.

4. To enter a no charge entry, enter the time and then change the value in the Total Cost box to zero. PDF/Word invoice will reflect hours and normal billable rate for this line item and the cost as "No Charge".

5. To enter an item at a different billable rate, normally when a time is entered, system automatically calculates total charges for the item based on staff's hourly rates for the case (and if a different hourly rate is not set for the case, staff's global hourly rates) and invoice reflects entered time and hourly rates in addition to the automatically calculated total cost for the item. Sometimes professionals charge different rates for certain items. For example, an attorney may charge an hourly rate of $200/hr for legal work but $100/hr for travel time. To have invoice reflect this different rate, enter the time as usual and then change the automatically calculated total cost to a desired number. In the previous example, if attorney enters 1 hour for travel, the system will fill the total cost box with $200. Change this amount to $100. PDF/Word Invoice will show hourly rate of $100/hr for this entered time.

Advance Payments

1. Advance Payments: If you have received an advance payment prior to issuing an invoice (and if the funds do not belong to a trust account), after generating the invoice as usual, click on the green dollar sign to record the received payment. Then click on the PDF icon to down the invoice. The invoice will reflect the received payment.

2. Enable/Disable Trust Fund Balance on Invoices: Invoice will show the payment to be deducted from client trust account (if funds are available) and balance payable by client (or zero if the trust funds are sufficient to pay the whole invoiced amount). If there is still a leftover amount in the trust account, the invoice will list that amount.
"Settings/Reports"->"Edit Business Information" -> "Show Trust Funds on Invoice" checkbox for enabling/disabling for using trust funds on Invoices.

Setting Different Hourly Rates For Different Cases

Click on the Cases (Projects) tab on the top of the page. In the left panel, select a desired case. On the right side panel, click on "Staff Access/Rates" tab. On the screen, check the checkbox in front of a staff name. An "Edit" link will appear. Click on that link to enter a new rate. Click Update. This process will do two things, first, if the selected staff is not an administrator, the selected staff will now have access to this case (administrators have access to all cases automatically). Second, a new hourly rate (only for this case) for the selected staff will be set.

PDF/Word (HTML) Invoice Settings

CaseFox offers various settings to format PDF invoices according to your needs. Keep in mind, there is no need to regenerate invoices after making changes to any of these properties. After making changes to one or more of these properties, you may go back to the invoice list and click on the PDF icon against a desired invoice to download updated invoice.

At present, CaseFox offers following settings (captions are self-explanatory):

  • Show Trust Funds On Invoice
  • Show Amount To Be Paid From Trust On Invoice
  • Do Not Show Rates Column On Invoice
  • Do Not Show Staff Column On Invoice
  • Show Staff Column Before Description On Invoice
  • Do Not Show Hour Column On Invoice
  • Do Not Show Previous Balance On Invoice
  • Show Taxable/Non-Taxable Markings For Invoice Items
  • Show Timekeeper Summary On Invoice
  • Show List Of Payments Since Last Invoice On Invoice
  • Show Fees/Expenses Separately On Invoice
  • Do Not Show Border Line On Invoice
  • Minimum 1 Inch Margins All Sides in Invoice PDF Document
  • Minimum 1/2 Inch Margins All Sides in Invoice PDF Document (uncheck both checkboxes for default 10mm margins)
  • Do Not Send Weekly Activity Reports
  • Do Not Send Calendaring Reminders
  • Enable Deleting Trust Fund Entries